
Extreme Mountain Biking Whistler: The Ultimate Gravity Mountain Biking Guide
Categories
Tags
Extreme Mountain Biking Whistler: The Ultimate Gravity Mountain Biking Guide
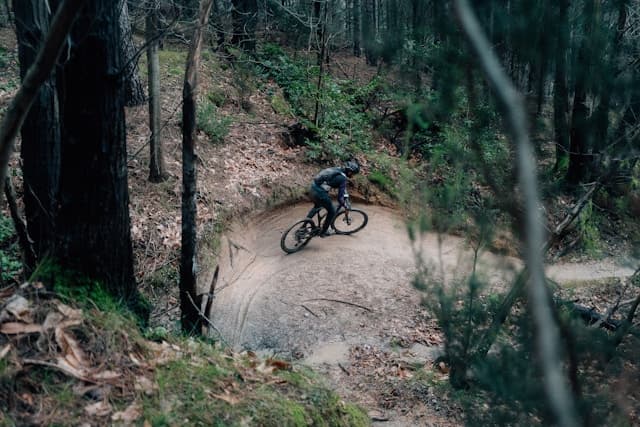
Launching off a 40-foot jump at 50 kilometers per hour, with Whistler Mountain's pristine wilderness stretching out below you and the Olympic rings of Fitzsimmons Park visible in the distance, you understand why this is the world's premier gravity mountain biking destination. Whistler Bike Park offers over 80 trails spanning more than 100 kilometers of purpose-built downhill terrain that challenges riders of all levels. After 10 years of riding, coaching, and competing on these legendary trails, I've witnessed how Whistler transforms good riders into great ones and pushes elite athletes to their absolute limits. Welcome to the ultimate mountain biking challenge.
Quick Facts at a Glance
- Location: Whistler Mountain, British Columbia, Canada
- Total Trails: 80+ purpose-built downhill trails
- Trail Difficulty: Green (Beginner) to Double Black Diamond (Expert)
- Vertical Drop: 1,460 meters (4,790 feet) maximum descent
- Lift Access: 4 chairlifts serve the bike park
- Elevation Range: 652-2,285 meters (2,140-7,497 feet)
- Season: May-October (optimal conditions June-September)
- Trail Types: Flow trails, technical descents, jump lines, freeride features
- Average Ride Duration: 15-45 minutes per run
- Equipment: Full-suspension downhill bike required for advanced trails
Why Experience Extreme Mountain Biking in Whistler?
Whistler Bike Park has established itself as the world's benchmark for gravity mountain biking. The combination of pristine trail design, varied terrain, and legendary bike culture creates an experience that attracts riders from across the globe. Whether you're a seasoned pro or an experienced rider looking to push your limits, Whistler offers challenges and rewards found nowhere else.
What Makes This Experience Extraordinary:
- World-Class Trail Network: Over 80 trails designed by professional trail builders
- Varied Terrain: From flow trails to technical gnarly descents
- Iconic Features: Legendary jumps, drops, and wooden structures
- Progressive Difficulty: Trails designed to build skills progressively
- Bike Park Culture: Vibrant community of passionate riders
- Stunning Scenery: Ride through old-growth forests with mountain vistas
- Professional Infrastructure: Lift access, bike service, and world-class facilities
Understanding Whistler's Trail System
Whistler Bike Park's trail network is organized by difficulty and terrain type, allowing riders to progress from beginner to expert terrain systematically.
Fitzsimmons Zone (Lower Mountain)
The Fitzsimmons zone contains Whistler's most famous and accessible trails, perfect for warming up and building confidence.
Signature Trails:
- A-Line: Legendary jump line with massive tabletops and smooth flow (Black Diamond)
- B-Line: Intermediate jump line perfect for progression (Blue Square)
- Crank It Up: Technical descent with rock gardens and drops (Black Diamond)
- Crabapple Hits: Expert jump line with massive gaps (Double Black Diamond)
Garbanzo Zone (Upper Mountain)
Requiring a second lift, the Garbanzo zone offers longer, more technical descents that test endurance and technical skills.
Signature Trails:
- Freight Train: High-speed technical descent with rock gardens and jumps (Black Diamond)
- No Joke: Technical trail with steep drops and challenging features (Double Black Diamond)
- Heart of Darkness: Extreme technical descent with massive exposure (Double Black Diamond)
- Garbanzo Express: Flow trail with stunning alpine views (Blue Square)
Peak Zone (Summit Access)
Accessible via the Peak Chair, this zone offers the most extreme terrain in North America with massive vertical and technical challenges.
Signature Trails:
- Top of the World: Epic alpine descent with 1,460m vertical drop (Double Black Diamond)
- Hey Bud: Extreme freeride with massive drops and gnarly rock gardens (Double Black Diamond)
- Dirt Merchant: Flow trail with massive jumps and speed (Black Diamond)
Perfect 3-Day Extreme Mountain Biking Adventure Itinerary
Day 1: Fitzsimmons Zone Fundamentals
Morning: Arrive at Whistler Village and rent bike and protective equipment. Professional bike fit and safety orientation. Warm-up on Fitzsimmons Express lift with easy blue trails (B-Line, Blue Velvet).
Late Morning: Progress to black diamond trails in Fitzsimmons zone. Session A-Line to build jump confidence and speed. Focus on proper body positioning and jumping technique.
Afternoon: Tackle technical trails like Crank It Up and Angry Pirate. Practice drops, rock gardens, and technical features. Multiple runs to build consistency and confidence.
Evening: Bike maintenance workshop, skills analysis with professional coach, and dinner discussion of progress.
Day 2: Garbanzo Zone Technical Descents
Morning: Early ride on Garbanzo Express to warm up on Garbanzo Express (blue) and Freight Train (black). Focus on endurance and technical line selection.
Late Morning: Session Heart of Darkness or No Joke depending on skill level. Technical descent practice with emphasis on steep terrain management and rock garden technique.
Afternoon: Alternative runs on Garbanzo trails, focusing on specific skills improvement. Video analysis and coaching between runs. Advanced line selection and speed development.
Evening: Recovery session, equipment inspection, and preparation for Peak Zone adventure. Alpine riding technique workshop.
Day 3: Peak Zone Epic Descent
Morning: Early departure on Peak Chair for Top of the World descent. Weather and safety briefing before alpine ride. Epic 1,460-meter vertical descent from summit to valley floor.
Late Morning: Multiple runs on Peak Zone trails (Hey Bud, Dirt Merchant). Focus on high-speed riding, massive jumps, and extreme technical features.
Afternoon: Final runs on favorite trails. Video documentation of riding progression. Comprehensive skills review and feedback session. Equipment return and celebration.
Essential Mountain Biking Equipment
Provided by Bike Shops & Rental Centers
- Full-Suspension Downhill Bike: 180-200mm travel bike (e.g., Trek Session, Specialized Demo, Santa Cruz V10)
- Full-Face Helmet: ASTM-certified downhill helmet
- Protective Pads: Knee/shin guards, elbow pads, chest protector (optional)
- Bike Tools: Tubeless tire plugs, multi-tool, chain breaker
- Water Bottle/Reservoir: Hydration system for alpine rides
What You Need to Bring
- Mountain Bike Shoes: Flat or clip-in shoes designed for downhill riding
- Gloves: Full-finger gloves with good grip and protection
- Eyewear: Goggles or sunglasses with clear lenses for forest riding
- Mountain Bike Clothing: Durable shorts, jerseys, lightweight layers
- Backpack: Lightweight hydration pack for extended rides
- Personal Items: Sunscreen, lip balm, trail snacks, personal medication
- GoPro/Action Camera: Optional for documenting your rides
Recommended Bike Specifications
- Frame Material: Aluminum or carbon (aluminum for durability)
- Suspension Travel: 180-200mm front and rear
- Wheel Size: 27.5" or 29" (29" recommended for Whistler conditions)
- Brakes: 4-piston hydraulic disc brakes (200mm rotors)
- Tires: 2.4-2.6" downhill tires with aggressive tread
Advanced Riding Techniques for Whistler Conditions
Jumping and Gap Skills
Whistler's jump trails require proper technique and confidence:
- Approach Speed: Maintain consistent speed for takeoff
- Body Position: Centered, ready to compress or extend
- Takeoff: Compression and extension at the right moment
- Flight Time: Stable body position, look ahead
- Landing: Absorb impact with proper body position
Technical Descending
Rock gardens and steep terrain demand advanced technique:
- Weight Distribution: Dynamic weight shifts for traction
- Brake Management: Modulate braking for control and speed
- Line Selection: Choose smooth lines through technical features
- Momentum Maintenance: Use speed to clear obstacles
- Look Ahead: Scan terrain 5-10 seconds ahead
Drop Skills
Proper drop technique is essential for safety and style:
- Approach: Appropriate speed for the drop size
- Takeoff: Controlled, deliberate takeoff
- Flight: Stable, balanced body position
- Landing: Proper absorption, bike and body alignment
- Recovery: Return to riding position quickly
Safety Protocols & Emergency Procedures
Pre-Ride Safety Checklist
- Verify all equipment is in excellent condition
- Complete comprehensive bike inspection
- Check suspension settings and tire pressure
- Verify helmet and protective gear fit properly
- Review trail conditions and difficulty ratings
- Confirm communication device or emergency plan
Trail Etiquette and Safety
- Yield Appropriately: Uphill riders have right of way, yield to slower riders
- Ride Within Limits: Choose trails appropriate for your skill level
- Stay on Trails: Don't cut corners or create unauthorized lines
- Group Management: Stay with your group, establish meeting points
- Emergency Communication: Know emergency numbers and procedures
Emergency Procedures
- Equipment Failure: Walk bike to nearest trail exit, call for assistance
- Injury: Stabilize patient, contact patrol, await evacuation
- Lost Rider: Establish meeting points, initiate search protocols
- Weather Emergency: Descend immediately, seek shelter if necessary
- Trail Closure: Follow park staff directions, respect closures
Costs & Budget Breakdown
Guided Mountain Biking Experience (3 Days)
- Bike Rental: CAD 300-400
- Includes: Full-suspension downhill bike, full-face helmet, protective pads
- Lift Pass: CAD 300-400 (3-day pass)
- Professional Coaching: CAD 400-600 per day (optional)
- Equipment Rental: CAD 100-200 (if needed)
- Accommodation: CAD 150-300 per night (Whistler Village)
- Meals: CAD 80-120 per day
- Total Budget: CAD 2,130-4,100
Independent Mountain Biking (3 Days)
- Lift Pass: CAD 300-400 (3-day pass)
- Equipment Rental: CAD 300-400 (if not bringing own bike)
- Accommodation: CAD 150-300 per night
- Meals: CAD 80-120 per day
- Gas & Transportation: CAD 100-200
- Total Budget: CAD 1,030-1,900
Equipment Purchase Investment
- Downhill Bike: CAD 6,000-12,000
- Protective Gear: CAD 600-1,200
- Helmet: CAD 300-600
- Clothing System: CAD 400-800
- Total Investment: CAD 7,300-14,600
Photography & Filming Tips
Best Camera Angles
- Jump Shots: Position slightly below or to the side of takeoff for dramatic perspective
- Technical Descents: Follow rider through rock gardens and steep sections
- Alpine Views: Capture rider with mountain and valley scenery
- Close-Ups: Detail shots of technique, equipment, and trail features
GoPro Settings for Mountain Biking
- Resolution: 4K at 60fps for smooth action
- Mounting: Chest mount or handlebar mount for stable footage
- Field of View: Medium for balanced perspective
- Protune: Flat color profile for post-processing
- Audio: Consider external microphone for better sound quality
Photography Tips
- Shutter Speed: 1/1000+ for freezing action
- Aperture: f/8-f/11 for depth of field
- Positioning: Scout locations with good angles and lighting
- Timing: Capture riders at key moments (takeoffs, landings, technical features)
- Golden Hour: Early morning and late evening light for dramatic shots
Best Time to Visit
Peak Season (July-August)
Advantages:
- Optimal trail conditions
- Longest daylight hours
- Full park operations
- Best weather conditions
Disadvantages:
- Highest crowds
- Maximum lift wait times
- Peak accommodation prices
Shoulder Season (June, September)
Advantages:
- Fewer crowds
- Lower accommodation costs
- Good trail conditions
- Pleasant temperatures
Disadvantages:
- Some trails may be closed for maintenance
- Shorter daylight hours
- Possible early-season dust or late-season rain
Early/Late Season (May, October)
Advantages:
- Lowest crowds
- Best value for money
- Quieter trails
Disadvantages:
- Limited trail access
- Potential weather issues
- Some facilities may be closed
Essential Requirements Before Riding
Experience Prerequisites
- Advanced Mountain Biking Skills: Minimum 3 years of regular mountain biking
- Technical Trail Experience: Comfortable on black diamond terrain
- Jump and Drop Skills: Confident on medium to large features
- Downhill Bike Experience: Familiarity with full-suspension bikes
- Physical Fitness: Excellent cardiovascular endurance and strength
- Risk Management: Understanding of personal limits and safety
Physical Preparation
- Cardiovascular Training: 4-6 months of consistent training
- Leg Strength: Squats, lunges, and cycling-specific strength work
- Core Stability: Planks, balance exercises, and core strengthening
- Upper Body: Push-ups, pull-ups for control and bike handling
- Endurance: Long rides and interval training for alpine descents
Medical Considerations
- Comprehensive Physical Examination: Ensure fitness for extreme riding
- No Recent Injuries: Especially knees, shoulders, or wrists
- Medications: Bring sufficient supply and inform riding partners
- Emergency Contact: Provide emergency information to park staff
Trail Maintenance and Conservation
Whistler Bike Park is a world-class facility that requires careful stewardship:
- Stay on Designated Trails: Protect surrounding ecosystem
- Respect Trail Closures: Closed trails are for your safety and environmental protection
- Report Trail Issues: Inform staff of damage or hazards
- Pack Out All Waste: Leave no trace in the backcountry
- Respect Wildlife: Observe from distance, don't disturb
- Support Trail Building: Contribute to trail maintenance programs
Whistler Mountain Bike Park Culture
Whistler has developed a unique mountain biking culture that emphasizes progression, community, and respect. Engage with the local community, learn from experienced riders, and contribute to the positive bike park atmosphere.
Local Knowledge
- Hidden Lines: Learn from locals about secret features and lines
- Trail Conditions: Daily updates on trail conditions and closures
- Community Events: Participate in races, clinics, and social rides
- Equipment Tips: Local recommendations for bike setup and maintenance
Future of Mountain Biking in Whistler
Whistler continues to innovate and expand its trail network, with new trails, improved facilities, and sustainable development practices. The bike park remains committed to providing world-class experiences while preserving the natural environment.
Infrastructure Development
- New Trail Construction: Ongoing addition of progressive trail networks
- Improved Lift Systems: Enhanced lift capacity and access
- Sustainable Practices: Environmental protection and conservation initiatives
- World-Class Events: Hosting major competitions and festivals
Final Thoughts & Planning Tips
Why Mountain Biking in Whistler Changes You
Riding Whistler's legendary trails transforms your perspective on what's possible on a mountain bike. The combination of perfect trail design, stunning scenery, and the challenge of progressive difficulty creates an experience that elevates your riding to new levels. The skills, confidence, and memories you take home stay with you forever.
Best Planning Tips
- Book Lift Passes Early: Peak season requires advance purchase
- Rent High-Quality Equipment: Professional downhill bikes make the experience
- Hire a Coach: Even one session dramatically improves your riding
- Arrive Early: Get acquainted with the park before peak crowds
- Prepare Physically: Train specifically for downhill riding demands
- Stay Flexible: Weather and conditions may affect trail access
When to Book
Peak season (July-August) requires booking lift passes and accommodation 3-6 months in advance. Shoulder season may have availability with shorter notice. Bike rental should be reserved 1-2 months ahead for peak season.
Making the Most of Your Experience
- Invest in Coaching: Professional instruction dramatically improves skills
- Progress Systematically: Build from easier to harder trails
- Document Your Rides: Photos and videos for memories and improvement
- Connect with Locals: Learn from experienced Whistler riders
- Ride Responsibly: Respect trails, other riders, and the environment
- Embrace the Challenge: Whistler rewards those who push their limits
Conclusion
Extreme mountain biking in Whistler represents the pinnacle of gravity mountain biking experiences. The world-class trail network, professional infrastructure, and legendary bike park culture create an adventure destination that challenges riders of all abilities. Whether you're conquering A-Line's legendary jumps, navigating Heart of Darkness's technical descents, or experiencing the epic Top of the World descent, Whistler offers challenges and rewards found nowhere else.
As you prepare for your Whistler mountain biking adventure, remember that proper preparation, appropriate equipment, and respect for the trails and environment are essential. The trails of Whistler Mountain Bike Park await—ready to challenge, inspire, and transform your mountain biking experience forever.
Adventure Knit Editorial
Destination research compiled and fact-checked by the Adventure Knit editorial team from published sources, operator itineraries, and official tourism boards. Spot something out of date? Tell us at hello@adventureknit.com.
Related Stories
 Canada
Banff National Park Canada: Rocky Mountain Wilderness Paradise
Expert guide to Banff National Park Canada. Rocky Mountains, Lake Louise, Moraine Lake, grizzly bears, glacier hikes, and Canadian Rockies adventure.
 Canada
Canadian Rocky Mountains: Ultimate Adventure Travel Guide
Complete Canadian Rockies guide covering Banff, Lake Louise, Jasper, hiking, wildlife, and adventure activities. Expert tips for your perfect mountain adventure.
 Canada
Rock Climbing Squamish Canada: Conquer Granite Chief
Ultimate guide to rock climbing in Squamish, British Columbia. Experience world-class granite climbing on The Chief, Shannon Falls, and Stawamus Chief. Expert tips, routes, costs, and preparation for Canada's premier granite climbing destination.
Enjoyed this article?
Explore more stories from our adventures around the world